Showing posts with label DIY Projects. Show all posts

4.14.2010

Pretty Pretty Placemats

The lovely woman who sits at the front desk of our office building divulged to me her husbands DIRE love of the UNC Tarheels. Born and raised a Maryland Terrapin fan, I just don't get it :). Nonetheless, she saw a set a place mats that I made, and asked if I would make her some for her husbands birthday. Place mats for a guy on his birthday? I'm telling you, the man LOVES Carolina.

I documented the process for you. I'm not going to lie, this is a pretty time consuming task and I did it over a few days time. Because honestly, after working a full time job, an hour commute to and from work, making dinner, and watching American Idol (haha), I just don't have the time to finish big projects in a day!

Stuff you'll need to get started (minus a few things I forgot to photograph-oops)


A yard of any color burlap
fabric remnants
craft paint
foam brush
stencil (I did mine on my Cricut. Not needed if you have painting skills)
**E6000
**anything you want to use as the flower center, I used little gems
**spray adhesive
**lighter

You will be able to get 4, 9x13in place mats from a yard of fabric.
First, just cut out all 4 rectangles. This is probably the most time consuming part. Burlap is kinda hard to cut straight if you aren't being really meticulous.


If you want to make a fringe on the burlap, just start pulling the little strands on the end out on all sides and it will make a nice border.

Take the scrap fabric and cut 6-8 circles starting with one about 5 inches in diameter. I used 2 colors here, but of course you could use whatever you like. Any thin, liner type fabric will do. Then take the lighter and just slightly singe the edges. I couldn't photograph this part for obvious reasons, but here is what they should look like.

stack them all together and you get this:


Then just take a needle and thread and sew the flower to the burlap.


Take your little flower center and the E6000, and glue it to the flower.


Next, take your spray adhesive and spray the back of the stencil. Lay it into place, and using the foam brush, start just dabbing paint.


Peel off while still wet, and your done!


I love them, she loves them and I have my fingers crossed her husband loves them! Anyone else out there ventured into place mat making territory? Would love to hear thoughts on the experience!

I've been pretty anti-social for a while, headed to party at the shabby chic cottage and remodelaholic, BNOTP, craftaholics anonymous and ASPTL!

3.22.2010

We Will Revive! (a Cornhole game)

("as long as we know how to paint, I know we will revive!" WOW, funny what a Monday morning can do to a person. Anywho...)

Why it's called Cornhole is unknown (and ridiculous to me) but it doesn't change the fact that this simple backyard game is awesome.

If you've never heard of it, all it is, is a basic bean bag toss game. 2 teams, each with 2 players, stand behind 2 wooden boards and toss bean bags into the hole of the opposing team’s board.

Now to the point. Our friend Kerri is a lover of both East Carolina University (ECU) and Cornhole. She came to me with the idea of making our own game boards. You can buy these boards all over the internet for close to $200. Like any thrifty DIY gal, I decided we could totally do it for ALOT less.

After some research about the regulation dimensions of the boards (this is serious folks) we planned a weekend to dive in head first. Well, as luck would have it, just a little over a week ago, I was at the beach and Jason and I drove in close to 9pm. We were about to turn onto the street where the house is, and like a shining light, there on the side of the road, was a set of Cornhole boards! Now, there was a reason they were abandoned.


Again, this is a game where you throw bean bags. If it was a game where you threw something like rocks, this might be suitable. I imagine their board tore up their beanbags pretty badly.

So we scooped ‘em up and decided to give them a new life. This was a HUGE plus and cut out about half of the projected cost. All that had to be bought new was 2 top board (1/2 plywood), spray paint, and the decals. Now, on to the overhaul.

They must have used regular latex paint and a blindfold when they first painted these things. Either that, or they just dunked them into the can.

(Stella can't stand to be left out. Diva)


The lazy, I want to get to the fun part, side of me just wanted to paint over this disaster. But, given I had a few minutes before Kerri arrived, I decided to get a head start on the BORING sanding task.


When she arrived she got right to work... at this point my hands were killing me so I was happy to become the photographer.

After almost 2 hours (I told you the paint job was AWFUL), we had the sides at least smoothed down enough for them to take a nice even coat of spray paint.


Next up, trim the boards down a little bit and drill the holes. Kerri is a bit of a rookie at the DIY stuff so she lent Jason a hand. She decided that now she MUST have a chalk box. You know, who doesn't need a chalk box?


Then Jason removed the old boards and we were left with this- (and again, Stella had to squeeze her way in)


The new boards went on next (we got excited and started painting too soon!)
(there is an awful lot of pink in this picture isn't there)

Finally, time for paint, each board got 2 good coats of black outdoor spray paint


I got to use my Cricut for this project as well. I cut out 2 phrases "No Quarter!" and "No Fear!" to go on each of the boards. After all our hard work spray painting, we wanted to ensure we didn't mess it up.


They got 3 very light coats of white spray paint to ensure no drips!


After a few minutes of drying, time for the big reveal!


Ok, maybe not yet. Showing you now would take the fun out of it :)
Then on went the decals. Nothing fancy, just a basic peel and transfer decal.


Done! Now you can see :)


She loves them! I love them! We all love them! The bean bags are on their way and I can image we will get plenty of use out of them this summer. This isn't the last you'll see of us sticking it to the very overpriced Cornhole man. Keep an eye out for a second DIY set (completely from scratch) in the next couple weeks. We have to have a Georgia set for our house of course :)

What are your favorite backyard/tailgate games?

Headed over to BNOTP for Met Monday. Come on over and see all the wonderful projects!
You can find me over at ASPTL for DIY Day!

2.24.2010

The Writings on the Pillow... literally

I can't sew. I have a great new sewing machine from my boyfriend's mom, but I haven't had any success with the self taught method. I am hoping next time we visit her (at the beach, just thought I would throw that in there), I will get a crash course.
Until then, I will buy pillows, or in this case, just buy a pillow slipcover. I got this one at Target for $4 a while back, and it's a great cover, just a little bland. It's currently in the guest room (still under decoration construction), and now it has a tad more pizazz. FYI: I didn't take a picture of the pillow case by itself, I'm easily excited and forget things! Oops :)

First, I got to use my brand new software, Sure Cuts Alot, for my Cricut. L-O-V-E. I just cut it on basic white card stock.


Then I sprayed the back of the card stock with this wonderful product. Works like a charm every time!

(believe it or not, we are NOT looking for a new place that isn't on the suns surface)
Pressed it into place


Using a foam brush and black fabric paint, started filling it in


Let it sit for a just a minute or 2. Didn't want the paint to crack when I peeled it off, so I removed it before the paint dried.


Here she is! I may add a graphic later on, but I wanted to make sure it was going to work before I got crazy. I really like it. It's sweet, simple and to the point.


I'm curious as to how you other non-sewers make your pillows special. Share your secrets :)
Linking up over at Shabby Chic Cottage for Transformation Thursday!

2.14.2010

And down they come...

The BF and I have been wanting to take down the ugly, dated sliding glass doors that lead from our dining room into the sunroom, and the kitchen to the sunroom. After cancelled plans for the weekend due to snow, we (he) decided to tackle that very project.
First let me start by saying that the oyster shell shaped chair you see in these photos is not ours. We inheritied it and it will be heading to Goodwill after failing to sell on Craigslist. But for now, that's where it lives.

Here is the BEFORE shot from the sunroom of both doors.

Inside the dining room looking out to the sunroom

Inside the kitchen looking out to the sunroom

Jason hard at work (my job was to photograph and sweep, and occascionally the "hold this so it doesn't fall, be careful it will cut you" person.


Then, on to taking the framing out

Here she goes!

Uh-Oh, take note of his pointer finger, if you can't make it out its pointing down. Why you ask?

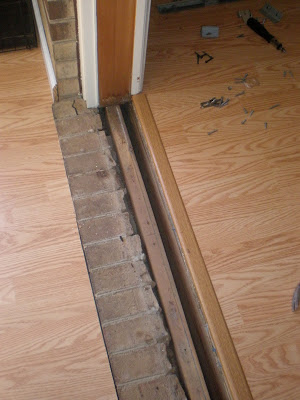
Because we can now see into the foundation of our house

REWIND- let's put that bottom part back until we can fix it :)

Here is the dining room entrance doorless. I will be painting the wood where the frame was, the color of the trim.


The kitchen entry: You want somma this?

Knockin it out

Ta-Dah


BEFORE AND AFTER


Eventually we might put french doors up, but for now we are liking the openness of the missing doors. Next up for the sunroom, installing a wood buring stove. Ooooooohh, ahhhhh. Should be exciting! :)